Okay so understanding tissue grafts. A student asked, “I’m having a hard time understanding tissue grafts and how to code them. How do I know when to use more than one code?” Okay, one more slide before I go to document camera.
Okay so the first thing tha twe need to understand are the types of grafts out there. There are auo grafts which basically, auto meaning self so it’s basically a graft coming from the patient. Then there’s homologous grafts which are also known as homo or allo grafts, homo meaning same so it’s coming from the same species. So another… a human donor, usually a cadaver because most people that are alive don’t go around donating their skin. And then the 3rd type is the hetero or xeno graft and that can be like man-made or synthetic type of graft and those are becoming more and more popular and you’ll see the code selection growing and growing because of all the different types. And then there’s the animal grafts. Okay so hetero or xeno grafts and the codes in the CPT book are going to have those terms. It’s important to understand that.
Alright, so if you have your CPT manuals, I’m going to start on page 71. And normally, when I start teaching grafts, I’m going to be talking tonight about the free grafts where they’re you know, in the case of an auto graft, lifted from one part of the body and put on another part. It’s not a twisting around of the skin and making a flap or something like that. Maybe I’ll cover that on another webinar. But what I was going to talk about tonight is the free grafts.
Understanding Tissue Grafts — VIDEO
So I normally ask, “Has anyone ever laid sod down in their yard?” And you don’t have to… a group will say yes, I have. So do you normally just lay sod down or do you do something first? And you normally prepare the ground. You dig it up. You make sure that the soil’s loose and ready to take that new sod because the goal is, when you lay the sod down, you want the roots of the grass in the sod to take into the new soil. Well, that’s the way it is when you do a skin graft. You want the new skin, the graft to take on the recipient site. So it all starts with these surgical prep codes.
Now there’s lots of guidelines that precede this but I’m going to dive right into where the codes are. There’s two bubbles, 15002 which bubbles in… it’s indented code 15003 and then 15004 which bubbles in the add on code 15005. The difference between the two is location, location, location. Alright so 002 is trunk, arms or legs and 004 is pretty much everything else. Bubbling and highlighting is a trademarked technique that we’re known for as well and this is how you do it. It’s actually quite simple. You just bubble in the parent code, the non-indented one with any indented codes and parenthetical notes and that becomes your bubble. And then you highlight everything after the semi-colon which every indented code is then highlighted.
Okay so once you do that then you can quickly look at the difference between your two bubbles that jumps out at you. You know, trunk, hands or legs and then we had the rest of the body areas underlined here. What I wrote in both of these bubbles is these are recipients. So when we were talking about face, scalp, eyelids, it’s talking about the recipient site. So this is all in the guidelines that precede the bubbles but I like to transfer the gist of the notes to my actual code manual because on the board exam or even in real world coding, you’re going to be looking at the codes. You’re not going to go re-read the guidelines unless you have to.
Okay so the parent code is saying first 100 sq. cm. or 1% of body area or infants and or children which is defined as 10 years or younger. That’s in the guidelines. And then the add on code is each additional 100 sq. cm. Now what I love about these codes is they say “or part thereof”. I wish all CPT codes were that specific. So what they’re saying is if you have 150, you can code 1 unit of 004 and one unit of 005 because 50 is a part thereof of the additional 100 sq. cm. And unfortunately, CPT is not consistent. In some areas, they will consider you know, part of that amount will count. Others will say no, you have to get the full amount to count it. So… and the reason is you have different commitees working in different sections of CPT. So obviously, you have dermatologists working in this area.
Okay so that’s the prep code so that’s going to be regardless of whether you have an allo, an auto graft, a xeno graft. You have to prep the receiving area, the recipient site.
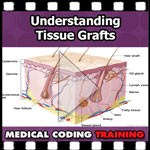
Now, going into the actual graft codes themselves, we need to look for those buzz words, the auto graft, the allo graft, the xeno graft. So we’re going to start with auto graft. This is the one that has the most codes next to those manmade ones. What you need to understand is when they talk about split thickness and full thickness, if you recall the… let me see if I can find a picture real quick here, here we go. The anatomy picture of the skin, okay. You’ve got… this is on page 57 of your CPT book. The dermis is also known the true skin. So always remember that dermis is key. And partial thickness would be right about you know, where this line is. you’re going part way through the dermis. Now obviously, the graft will take better the thicker it is. The thicker your sodd is, the better chance you’re going to have that it’s going to take. But it’s a trade off. If they take a full thickness graft then the donor area is going to suffer. So they have to make that decision with the trade off because sometimes they’ll do a partial thickness, sometimes they’ll do a full thickness. So now that you have that in mind, these will make a little bit more sense.
So we’ve got a pinch graft which is just what it says, this little teeny pinch of tissue and our next bubble goes 15100 to 101. I wrote split because it’s a split thickness and it’s an auto graft. So I write my little buzz words, split, auto and this is a recipient site bubble. And then we’ve got location mentioned here.
And so if you picture this in a real world coding sceneario or even a board exam question and you know, you have a couple of questions, by doing this bubbling and highlighting, it’s going to jump right out. Oh, this one’s a split graft. This one’s an epidermal graft. Or it could be like, “Oh these… they’re both epidermal but the difference is location.” Trunk, arms or legs versus everything else or you can have a comparative bubble that’s not an auto graft.
So you know, bubble and highlighting, write your buzz words and that will help you. So you need to code for the prep area and you need to code for the graft. Let me go through just a few more so you can see how the bubbling and highlighting works for these. 120 and 121 is your split auto. This is just another location. Now if you’ll notice, they weren’t in order. If we go back to the previous page, we had a pslit auto followed by 2 epi autos. So that’s why we always want to compare and contrast all the codes in the category to make sure that we have all the choices.
Then bubble 130 and 135 are the dermal bubbles. The difference between the two is location. Once you’re in there, it’s first 100 sq. cm. each additional or part thereof.
Then we’ve got tissue cultured. What they’re doing now is rather than taking the donated skin and then immediately grafting it, they’ll prepare it and have it cultured for… I don’t know how long it typically is. But again, the goal is to make it prepared so it will take better on the site. So these are the cultured, tissue cultured auto graft.
Here’s our full thickness so 15200 and 15220, 15240, 15260. The difference between all of them is the location of where these are occuring. Then we move on to the skin substitute grafts on page 73 and you can see these are new for 2012, application of skin substitute to trunk, arms or legs and it says application because obviously, they’re not you know, removing it from the donor site.
By the way, the questioner did ask, “How many codes?” If you need to also code for repairing the donor area, you can code for that separately. The guidelines tell you that you know, right in the print there. So you code the prep of the area. You code the graft code and then you code any repair to the donor area that you need to do. And so there’s some more skin substitute codes and then we go on to flaps.
So that’s just for the free grafts. I hope that was helpful.
Understanding Tissue Grafts- Related Material
- Free Medical Coding Guides and Tools
- Medical Coding Career
- Grafts – AAPC Medical Coding & Billing Forums